Navigation Configuration (9.7)

With the 9.7 release there is a brand new navigation configuration tool, we heard a lot about the original configuration tool (v.9.3) and the updated HTML Editor (v9.4 Onwards) and many of you expressed a need for a super simple way to edit / add & remove links from the top level navigation. We even added a ‘custom link’ ability so you can easily link any navigation link to a URL of your choice – it really couldn’t be easier.

*By the way, the HTML Editor is still there but is now labeled as a CSS editor, you can find it under Site Content > Css Editor.
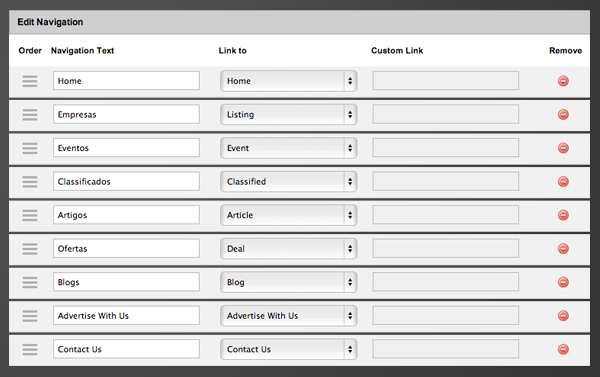
eDirectory 9.7 Navigation Configuration Tool

The Simple Explanation

Order
Drag and drop ordering, hover, click and move these items around as you see fit.

Navigation Text
What do you want the link the navigation to actually say? Perhaps you would rather ‘Companies’ instead of the word ‘Listings’,  just tap in your new text here.

Link To
All modules in eDirectory have their links hard coded (the module links can not be changed), but if you’re linking to a module just select it from here. If however you wish to add you’re own link pointing to another page, another site or anywhere else that’s not a module, choose the ‘Custom Link’ option.

Custom Link
This field is only available after selecting ‘Custom Link’ in the Link to column, enter a full URL here and you’re done. (Don’t forget to include the http://…)

Remove
Pretty self explanatory, press this and the row is removed.

You can also pick from the Header or the Footer navigation, and if you check the bottom of the table you’ll find a super handy ‘Add Row’ button. I hope you like the new navigation tool, and our move towards a more streamlined approach.

eDirectory Language Center

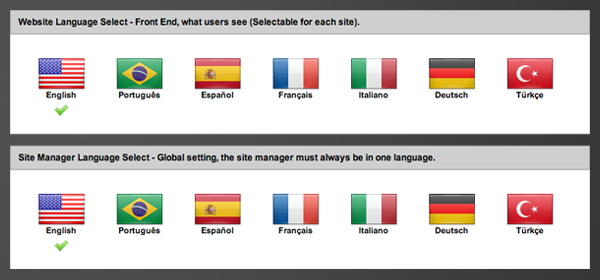
With the release of 9.7 comes a brand new language center. Pick the language of both the site (front-end) and the sitemgr (admin) independently for any domains or subdomains you own and run eDirectory on – it really couldn’t be any simpler – did you mention you can edit every single piece of the language integration?

*Language switching on demodirectory.com will return shortly.

Why a new center?

From an SEO standpoint, having all of the data criss-crossed across 7 pages (one for each language and translation) turned out to be a bit of a nightmare. By splitting websites into subdomains or indeed entirely different domains they retain a great deal more of their rank (multiple pages are not considered duplicate content anymore), the content is individual, the sites are unique, and if you are writing you’re site in Spanish or Portuguese, surely it’s better for you to host that site with the correct TLD (Top Level Domain) – .com.br & .com.es respectively.

We thought long and hard about the best way to approach languages, they were many ideas on the table, but in the end simplicity won out, a language per site, with the option to pick a global language just for the sitemgr. Read on for some more details of how this all works:

Selecting your languages

Selecting your languages

Simply login into the sitemgr and head to the ‘Language Center’, and on the first tab select both the language for the main site (Front End) and the language for the back end (Sitemgr), that’s it you’re done, these settings can be changed as often as you want or need.

Language Editor

Downloading Language Data

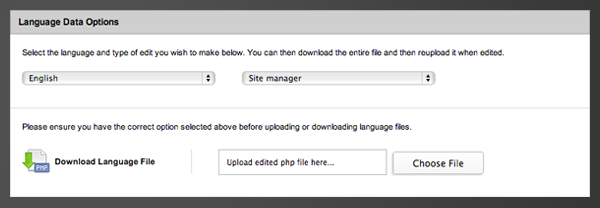
eDirectory requires two language files to function correctly, they can both be downloaded here, simple select the language and section you wish to edit (Sitemgr or Front End), then hit the ‘Download Language File’ button. Edit on your computer until you have the file the way you want, then simple return to this screen and upload – job done.

A lot of site users ask for a really easy way to edit the language data – this is it.

Add Languages

Adding a language to eDirectory

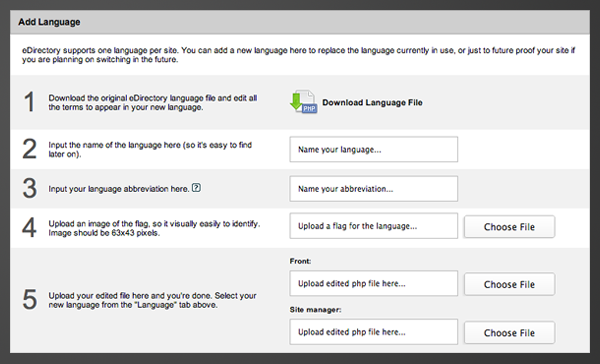
So, eDirectory doesn’t support a language you want? Not a problem, all the tools are here for you to add you very own language (providing you do the translation of course). Head off to the ‘Add Language’ page and simply follow the 5 steps for creation of a new language, tap in a few bits of information and the language is instantly available for use – we love it.

The Tiny Things

Changing names and flags

You know how it is, you make a change, upload a language and then find out you used the wrong flag or even worse names the language incorrectly – open the ‘Name & Flag’ tab in the site manager area and edit these oh’ so important settings here.

We hope you like the new language center, it’s really a much better way to organise the languages, it’s simple, clean and easy to use.